Do you often manipulate images as part of your daily job?
I personally do the graphics work for this website before uploading it to my blog.
One of the most common image editing tasks is resizing, which tremendously reduces the image size from MB to KB.
This allows images to load quickly on the web even if someone is using a slow internet.
I usually use the ImageMagick tool to perform this operation from the command line.
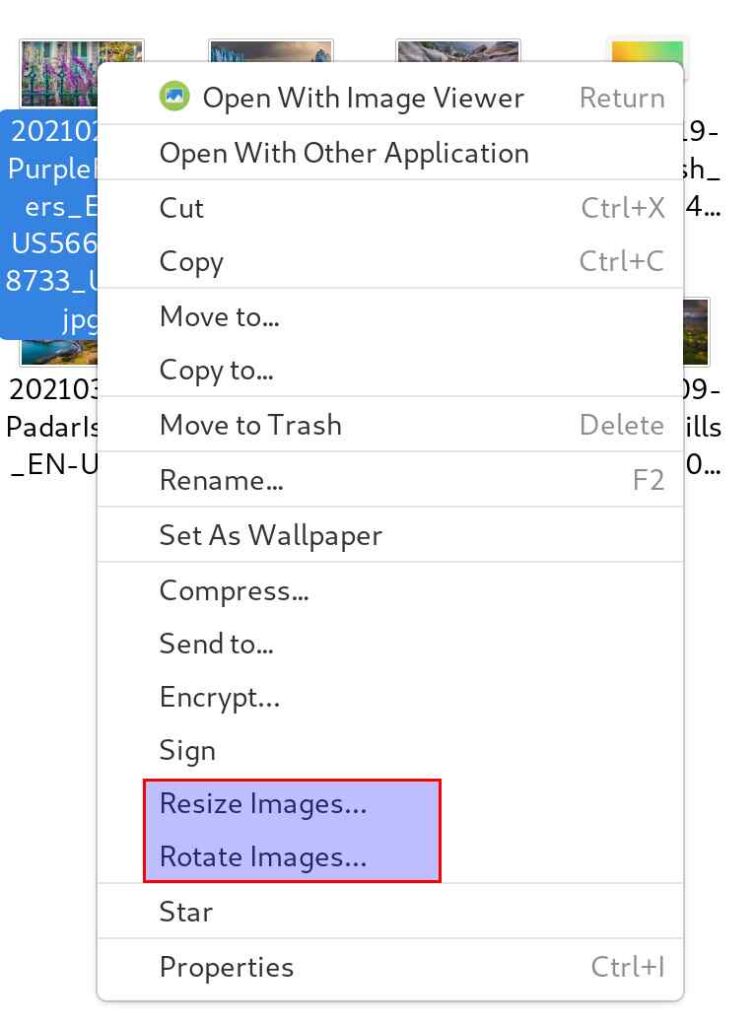
But I recommend using the “Nautilus Image Converter” which gets integrated in the right-click context menu in the image file.
It is very handy and works well within seconds. But if you want to perform this action in bulk, I would recommend using the ImageMagick tool because it comes with a batch operation.
What’s Nautilus?
Nautilus is a file manager used by GNOME and several other desktop environments. It provides a simple and integrated way to manage your files and applications.
This file manager lets you organize your files into folders. This is similar to “File Explorer” in Windows.
How to Install Nautilus Image Converter Plugin?
There are many Nautilus plugins that enhances its capabilities. They are not installed by default, but you can choose to install them as per your needs.
We are going to install a plugin called Image Manipulator,, which allows you to rotate or resize the images by a right-click on the image.
Please run the command below to find out if your Linux system is using Nautilus File Manager:
$ nautilus --version
GNOME nautilus 3.36.3
If you have Nautilus file manager on your system, you will get the same results as above, but the version may vary.
Make sure you already have ImageMagick installed on your system, as this plugin uses ImageMagick for image manipulation. If not, you need to install it.
Note: Make sure you already have “Development Tools” installed on your Linux system as a prerequisite for this.
For RHEL/CentOS 6/7 systems, use the yum command to install ImageMagick:
$ sudo yum install -y ImageMagick ImageMagick-devel
For RHEL/CentOS 8 and Fedora systems, use the dnf command to install ImageMagick:
$ sudo dnf install -y ImageMagick ImageMagick-devel
For Debian/Ubuntu systems, use the apt command or apt-get command to install ImageMagick:
$ sudo apt-get update
$ sudo apt-get install imagemagick
For openSUSE systems, use the zypper command to install ImageMagick:
$ sudo zypper install -y ImageMagick
Finally, install the Nautilus plugin using the commands below.
For Ubuntu/Debian system:
$ sudo apt install nautilus-image-converter
For Fedora system:
$ sudo dnf install nautilus-image-converter
For Manjaro/ArchLinux system:
$ sudo pacman -S nautilus-image-converter
For openSUSE system:
$ sudo zypper install nautilus-image-converter
Once installed, restart Nautilus using the command below.
$ nautilus -q
How to Use Nautilus Image Converter Plugin?
After you finished the installation, right click on an image, and you should see the two new options in the context menu, “Resize” and “Rotate”.

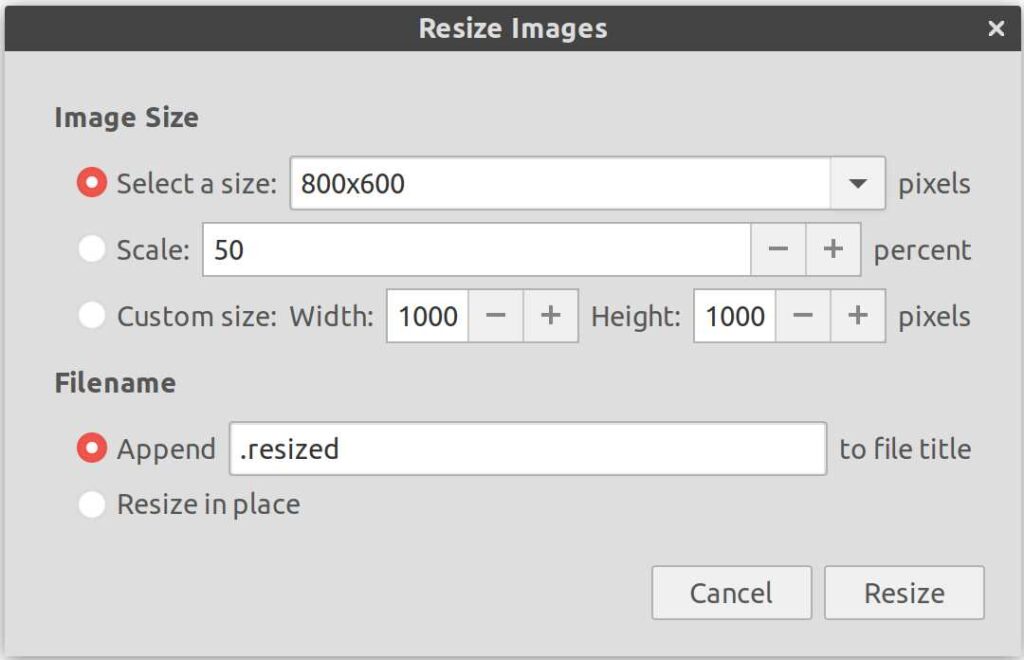
When you select the resize option in the context menu, you will get a pop-up window with some options for resizing the image as shown below:
- Select a size: Select the image size you want to resize. In the drop-down, you will get the following pixels 96×96, 128×128, 640×480, 800×600, 1024×768 or 1280×960.
- Scale: This is the compression level. By default, it comes with 50% and you can change this based on your needs. I recommend using the default value.
- Custom size: This allows you to set a custom size you want to resize the image to.
- Append: By default, it adds “.resized” to the converted image file name, which helps to retain the original image file.
- Resize in place: You can change the behavior above by selecting this option. This option replaces the original image with a modified image.

Click the “Resize” button to complete the image conversion.
Closing Notes
In this article, we have demonstrated how to resize the images on GNOME desktops with a right click on images by installing the necessary applications/plugins (GNOME is a free and open-source desktop environment for Unix-like operating systems).
If you found this article helpful, please do share with your friends and spread the knowledge. Please feel free to comment below if you have any queries/concerns. We will get back to you as soon as we can. Happy learning!


You need to change the article title.
This solution will only work for GNOME based desktops that can actually support the plugin.
You are technically correct that this functions across Linux, but the requirement remains for GNOME to be present in some fashion. Title is misleading otherwise.
Hi John,
I have updated the title of the article accordingly.
Hi,
Thank you so much for the great topic,
Hi Jalal,
Thanks and welcome