CentOS Web Panel is a award winning, future rich, completely FREE & open source Web Hosting control panel which is having almost all the rich futures, like how the paid web hosting control panel have. None of the Free Web hosting control panel don’t have the features like CWP because, in one shot this will install all the required software’s such as web server (Apache), dns, database (MySQL or MariaDB), email, FTP, php, phpmyadmin, webmail, etc.., which is mandatory to host a Domain.
CentOS Web Panel supporting MariaDB, Nginx & varnish cache which will improve your web site performance and you don’t want to configure separately by default it’s installed and you need to rebuild it once again based on your requirement. Also its support Softaculous & WHMC plugins for easy integration & installation. I never felt with other free web hosting control panel like CWP.Another great feature, you can easily migrate from cPanel to CWP. Only one disadvantage, it will not support CentOS 7 & Other Linux Distributions such as Debian, Ubuntu, etc..
The latest version of CWP 0.9.8.11 released on January 14, 2016. Still CWP team are working hardly to implement new things and trying to fix existing issues to make it CWP as a No.1 Web Hosting Control Panel.Anybody can manage CentOS Web Panel with zero percentage (0%) of Linux Knowledge, New bies can easily manage their environment without headache because everything you can manage from CWP GUI.
CentOS Web Panel Features
- Install full LAMP Stack on One shot (apache,php, phpmyadmin, webmail, mailserver, dns, etc..,)
- Apache Web Server (Mod Security + OWASP rules optional)
- PHP 5.4 (suPHP, SuExec + PHP version switcher)
- MySQL/MariaDB + phpMyAdmin
- Postfix + Dovecot + roundcube webmail (Antivirus, Spamassassin optional)
- CSF Firewall
- File System Lock (no more website hacking, all your files are locked from changes)
- Backups (optional)
- AutoFixer for server configuration
- CloudLinux + CageFS + PHP Selector (License Must)
- Softaculous – Script Installer (Free and Premium)
- Optional with web server (Varnish Cache server & Nginx Reverse Proxy)
- PHP Switcher (switch between PHP versions like: 5.2, 5.3, 5.4, 5.5, 5.6, 7.x)
- PHP Selector select PHP version per user or per folder (PHP 4.4, 5.2, 5.3, 5.4, 5.5, 5.6, 7.x)
- Tomcat 8 server management & install in one click
- Add, Edit, List and Remove DNS zones
- Add, List, Edit adn Remove Users
- SpamAssassin, RBL checking, AmaViS, ClamAV, OpenDKIM
- Services Status (Quick services restart eg. Apache, FTP,Mail…)
- Live Monitor MySQL process list
- cPanel Account Migration (restores files, databases and database users)
- For detailed CWP Features
- Refer CWS wiki page to know more about CWP
Prerequisites for CentOS Web Panel
- Set Proper & fully qualified Hostname
- Set Static IP
- fresh installation of CentOS/RHEL/CloudLinux 6.x
- 32 bit Operating System requires minimal of 512 MB RAM
- 64 bit Operating System requires minimal of 1024 MB RAM (recommended)
- CWP doesn’t has an uninstaller and we need to reinstall the server
1) Update server packages
First update your server packages to latest version and install wget package which is used download the files from web.
[Install wget]
# yum -y install wget

[Update your system packages to latest]
# yum -y update

[Reboot the server]
# shutdown -r now
2) Install CWP
First update your server packages to latest version and install wget package which is used download the files from web.
[CWP Installer with MySQL version 5.1]
# cd /usr/local/src
# wget http://centos-webpanel.com/cwp-latest
# sh cwp-latest

[CWP Installer with MARIA-DB 10.1.10]
# cd /usr/local/src
# wget http://centos-webpanel.com/cwp-latest
# sh cwp-latest -d mariadb
If you face any error while downloading the above link, then use below one.
# wget http://dl1.centos-webpanel.com/files/cwp-latest
Initiate the CWP installation and wait, it will take hardly 30 mins, so sit back and have a cub of coffee.CWP successfully installed, just not the MysQL password and reboot the server.
#############################
#      CWP Installed        #
#############################

go to CentOS WebPanel Admin GUI at http://SERVER_IP:2030/

http://192.168.0.100:2030
SSL: https://192.168.0.100:2031
---------------------
Username: root
Password: ssh server root password
MySQL root Password: MKFJUE3$

#########################################################
          CentOS Web Panel MailServer Installer
#########################################################
SSL Cert name (hostname): server.2daygeek.com
SSL Cert file location /etc/pki/tls/ private|certs
#########################################################

visit for help: www.centos-webpanel.com
Write down login details and press ENTER for server reboot!
Press ENTER for server reboot!
After rebooting, you will see the below screen.
Last login: Thu Feb 25 22:11:47 2016 from 106.51.243.86
CentOS release 6.7 (Final)
Linux vps50253.vps.ovh.ca 2.6.32-042stab111.12 #1 SMP Thu Sep 17 11:38:20 MSK 2015 x86_64 x86_64 x86_64 GNU/Linux

********************************************
Welcome to CWP (CentOS WebPanel) server
Restart CWP using: service cwpsrv restart
********************************************

if you can not access CWP try this command: service iptables stop

 22:42:20 up 0 min,  1 user,  load average: 0.16, 0.04, 0.01
USER     TTY      FROM              LOGIN@   IDLE   JCPU   PCPU WHAT
root     pts/0    106.51.243.86    22:42    0.00s  0.00s  0.00s -bash

Filesystem         Size  Used Avail Use% Mounted on
/dev/ploop59527p1   11G  2.9G  7.4G  28% /
none               512M   16K  512M   1% /dev
none               512M     0  512M   0% /dev/shm
/dev/ploop59527p1   11G  2.9G  7.4G  28% /var/named/chroot/etc/named
/dev/ploop59527p1   11G  2.9G  7.4G  28% /var/named/chroot/var/named
/dev/ploop59527p1   11G  2.9G  7.4G  28% /var/named/chroot/etc/named.conf
/dev/ploop59527p1   11G  2.9G  7.4G  28% /var/named/chroot/etc/named.rfc1912.zones
/dev/ploop59527p1   11G  2.9G  7.4G  28% /var/named/chroot/etc/rndc.key
/dev/ploop59527p1   11G  2.9G  7.4G  28% /var/named/chroot/usr/lib64/bind
/dev/ploop59527p1   11G  2.9G  7.4G  28% /var/named/chroot/etc/named.iscdlv.key
/dev/ploop59527p1   11G  2.9G  7.4G  28% /var/named/chroot/etc/named.root.key
3) Access CWP
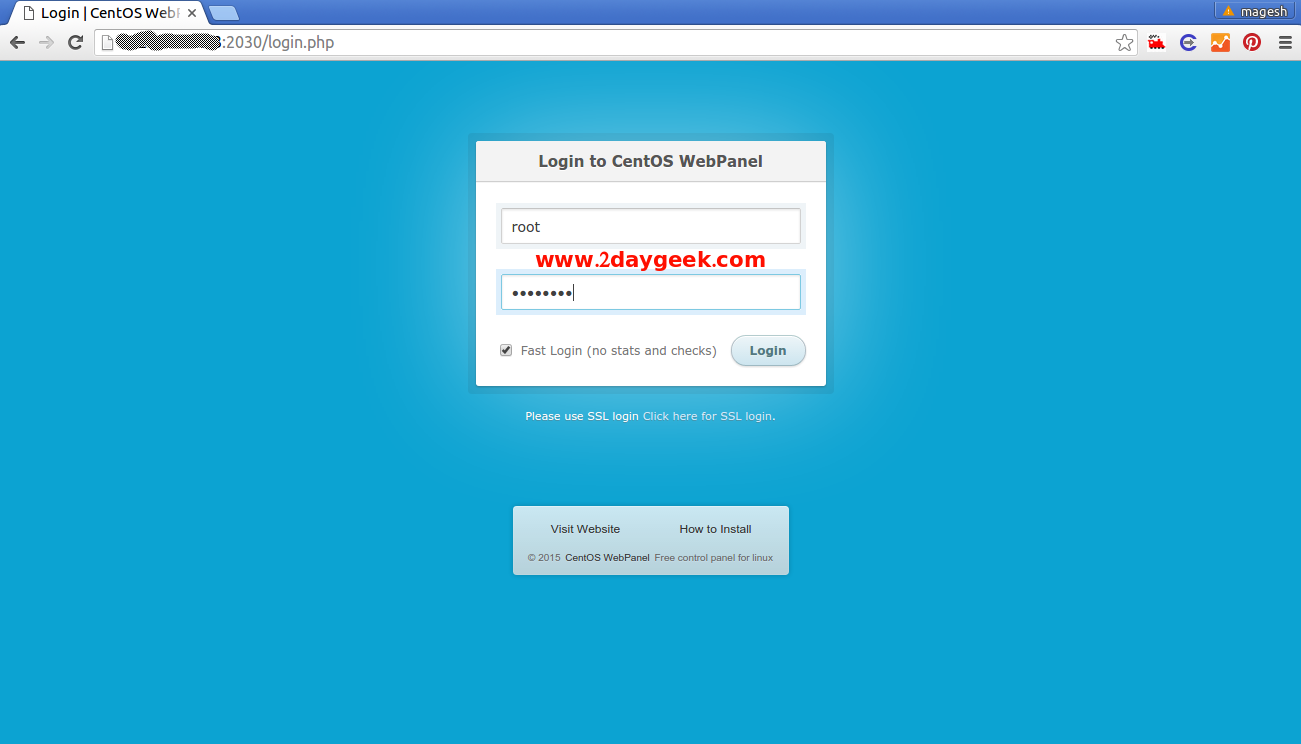
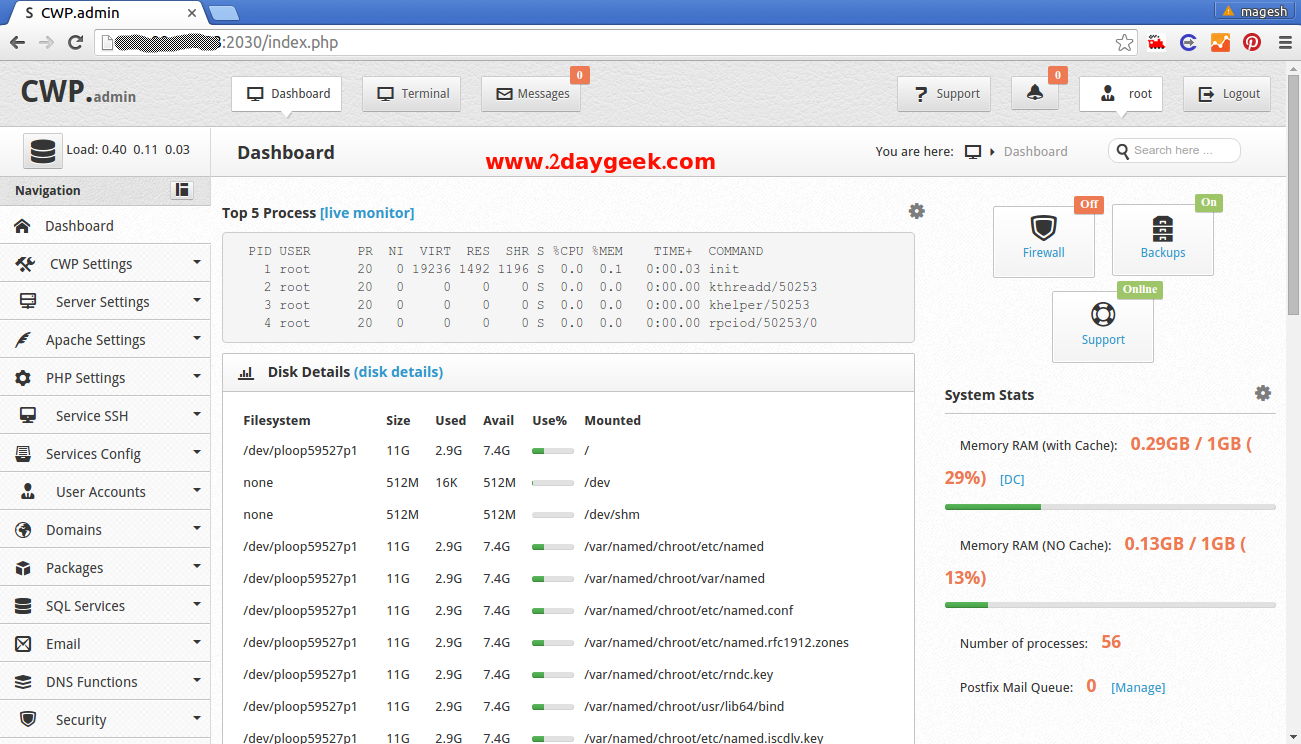
Navigate your browser to http://SERVER-IP:2030/ or http://SERVER-HOSTNAME:2030/ and enter your login details User Name : root & Password : your root password to get into the CWP.
Home, Dashboard.
4) Setup CWP to host domain
We need to configure below mandatory things on CWP to make it for Production environment.
- Setup nameservers
- Setup shared ip (must be your public IP address)
- Setup at least one hosting package (or edit default package)
- Setup root email
- Enable CSF Firewall
- Add New Domain
- Enable Varnish cache or Nginx Reverse proxy
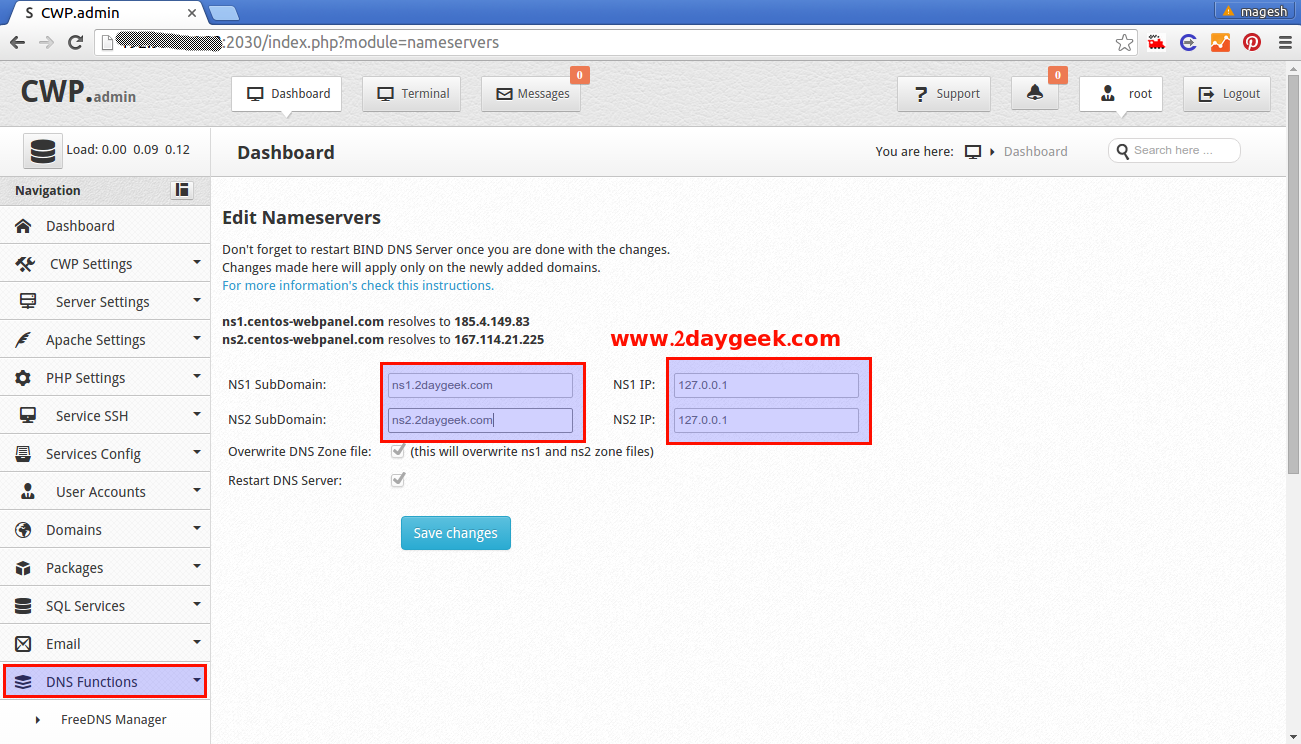
Setup nameservers : Navigate to DNS Functions >> Edit nameservers IPs
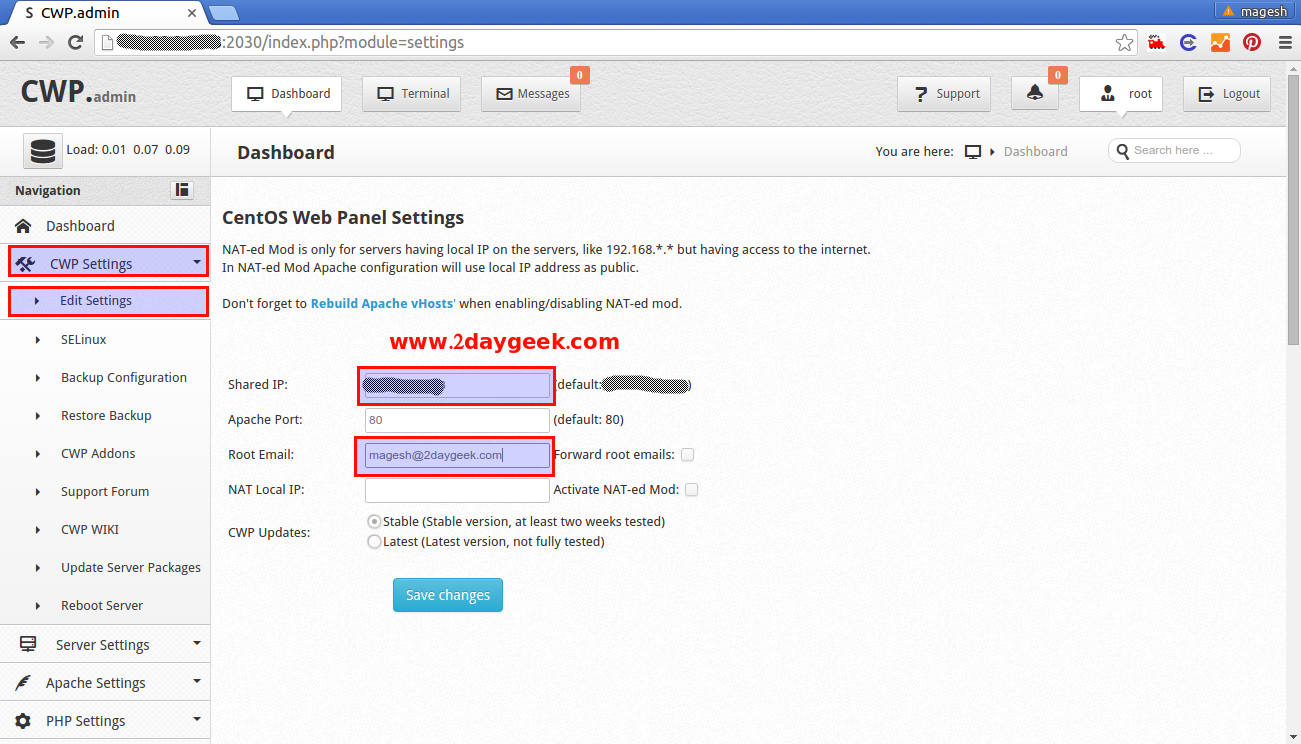
Setup Share IP & root email ID : Navigate to CWP Settings >> Edit settings
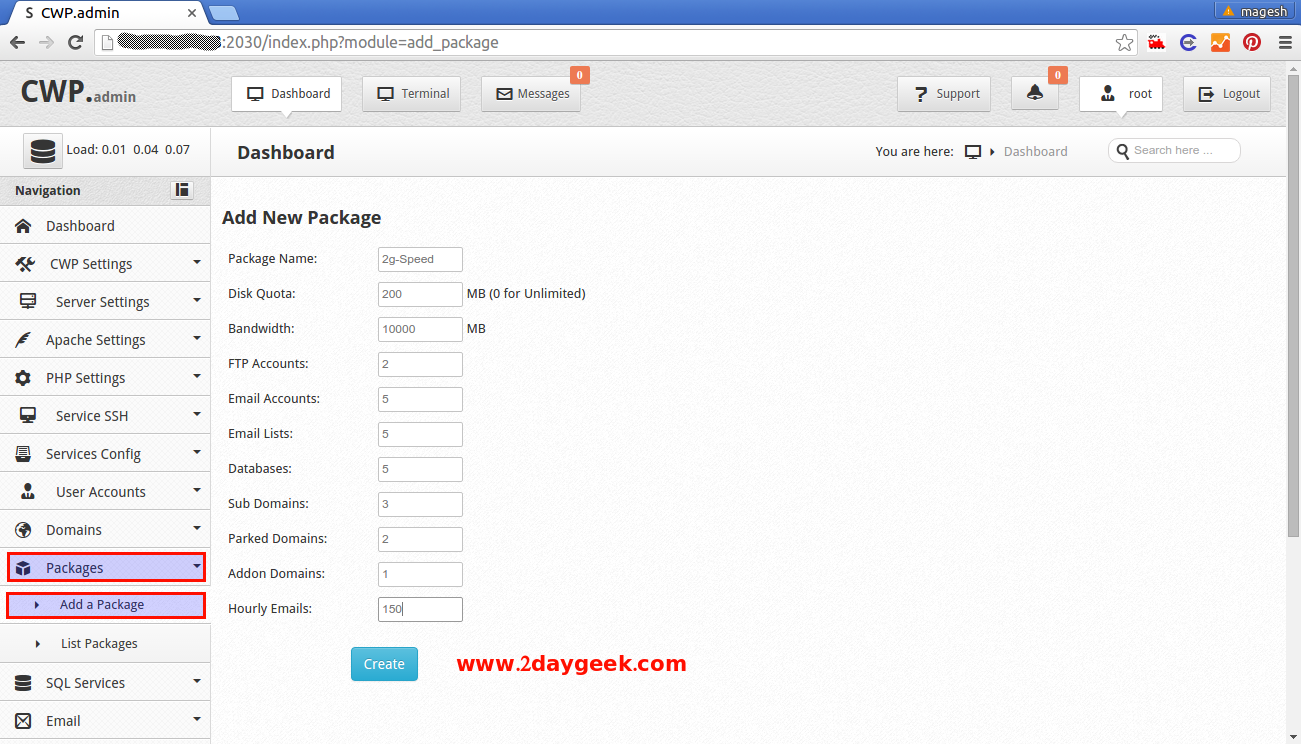
Setup Hosting Package : Navigate to Packages >> Add a Package
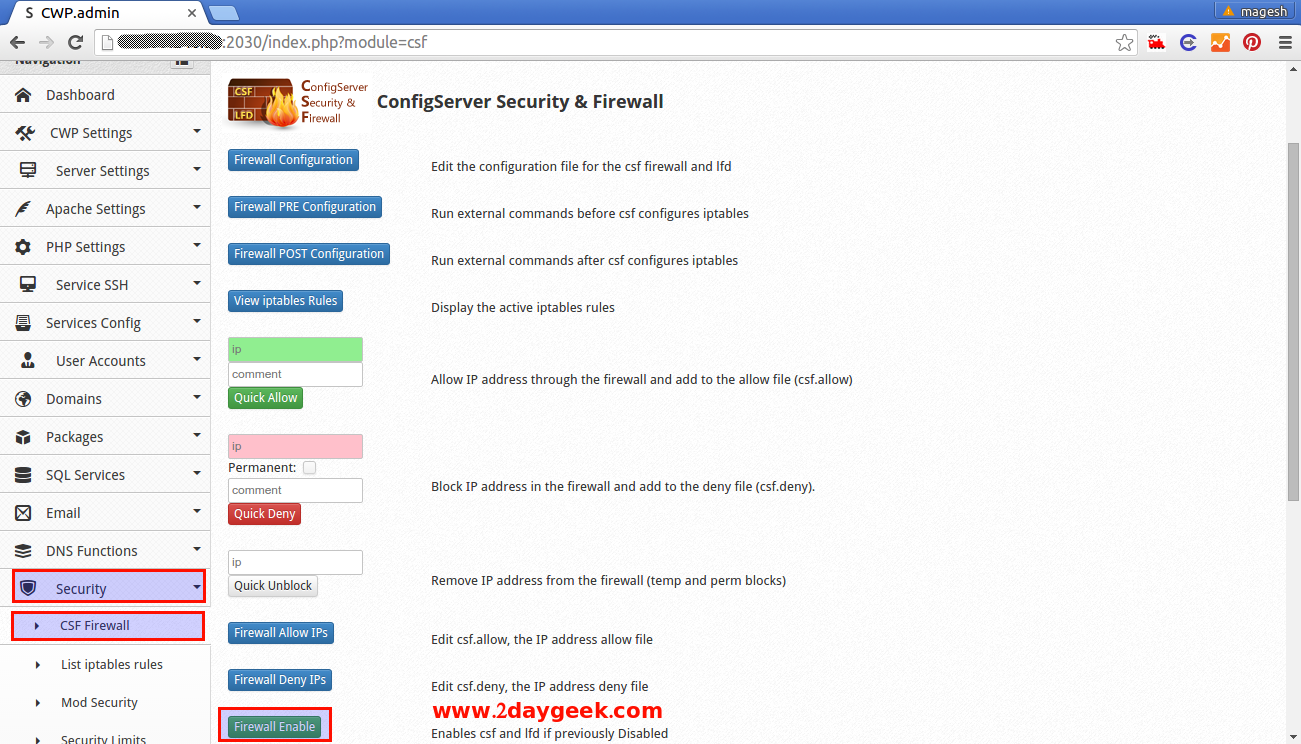
Enable CSF Firewall : You can directly enable CSF by clicking CSF button from your Dashboard or Navigate to Security >> CSF Firewall >> Firewall Enable
Add New Domain : Navigate to Service Config >> Service Monitor
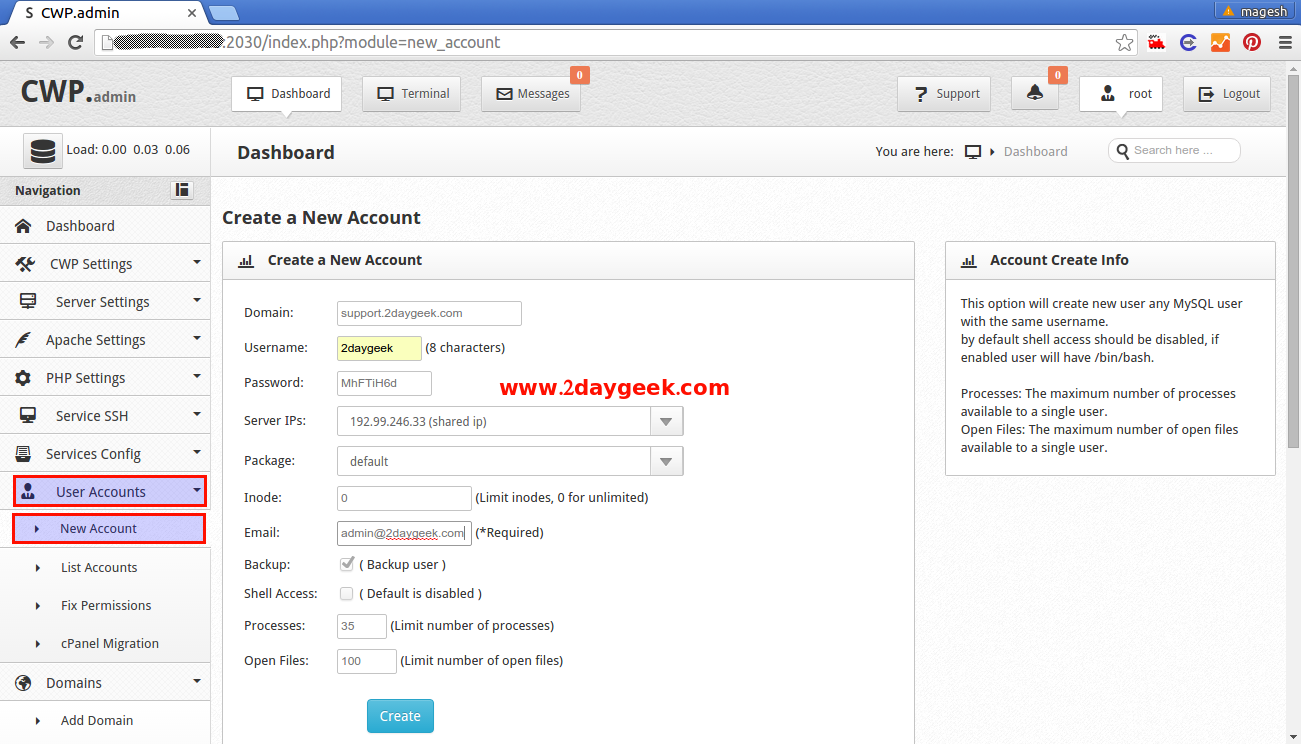
Service Monitoring: Navigate to User Accounts >> New Account
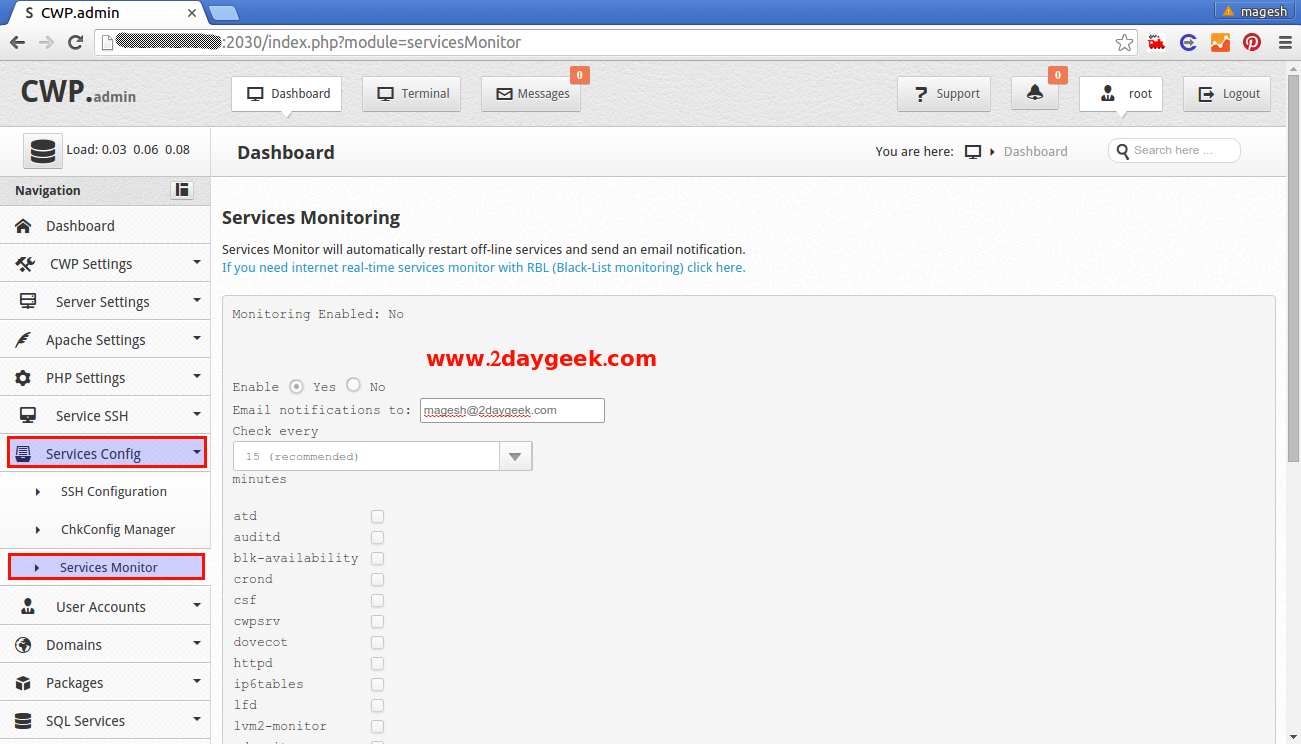
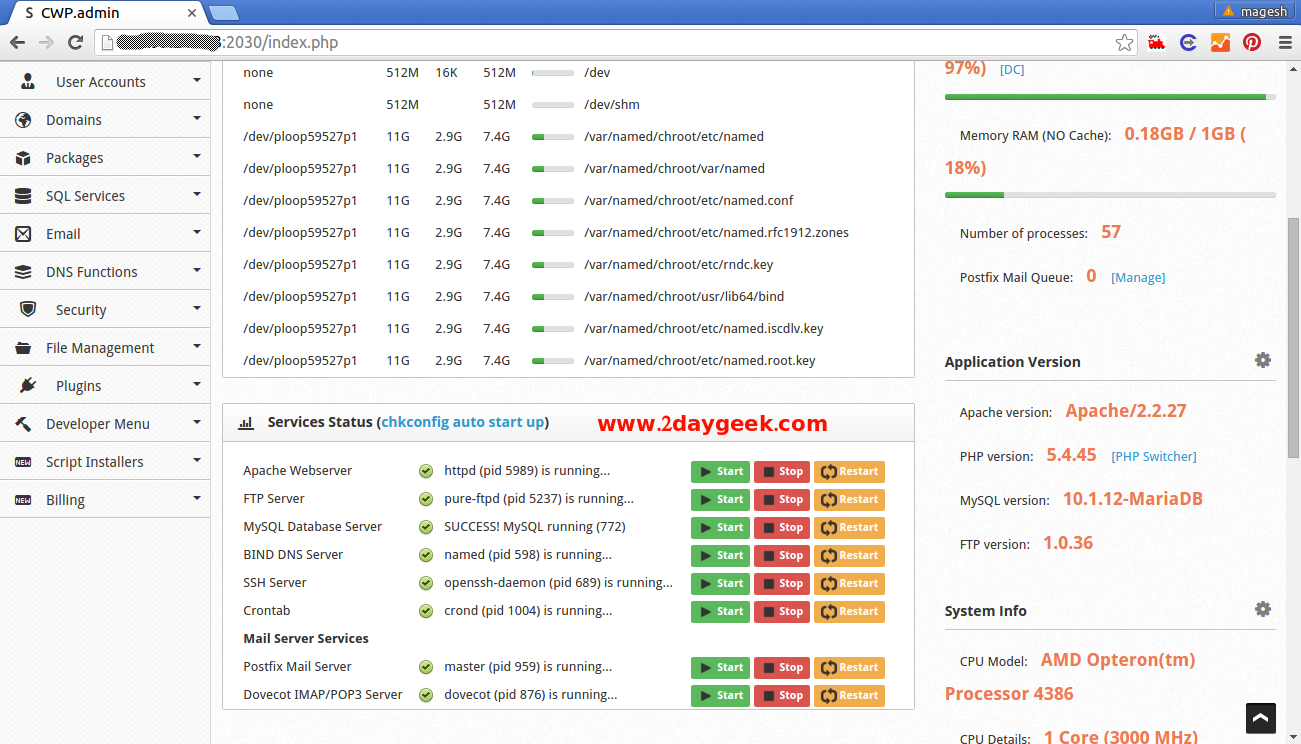
Service Status: Just Scroll down then you can see all the service status. If you want to start, restart & stop.
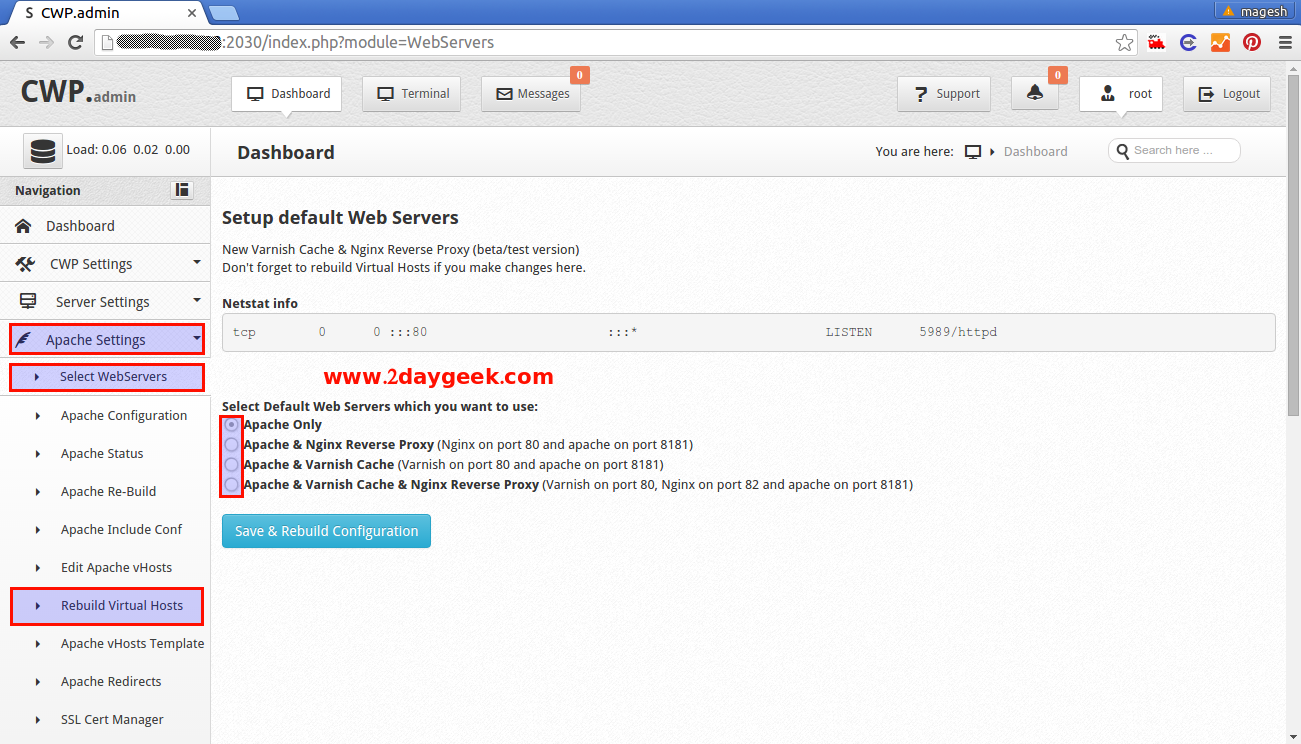
Choose Web Server: Navigate to Apache Settings >> Select WebServers >> Choose the Web Server option >> Then Rebuild Virtual Hosts
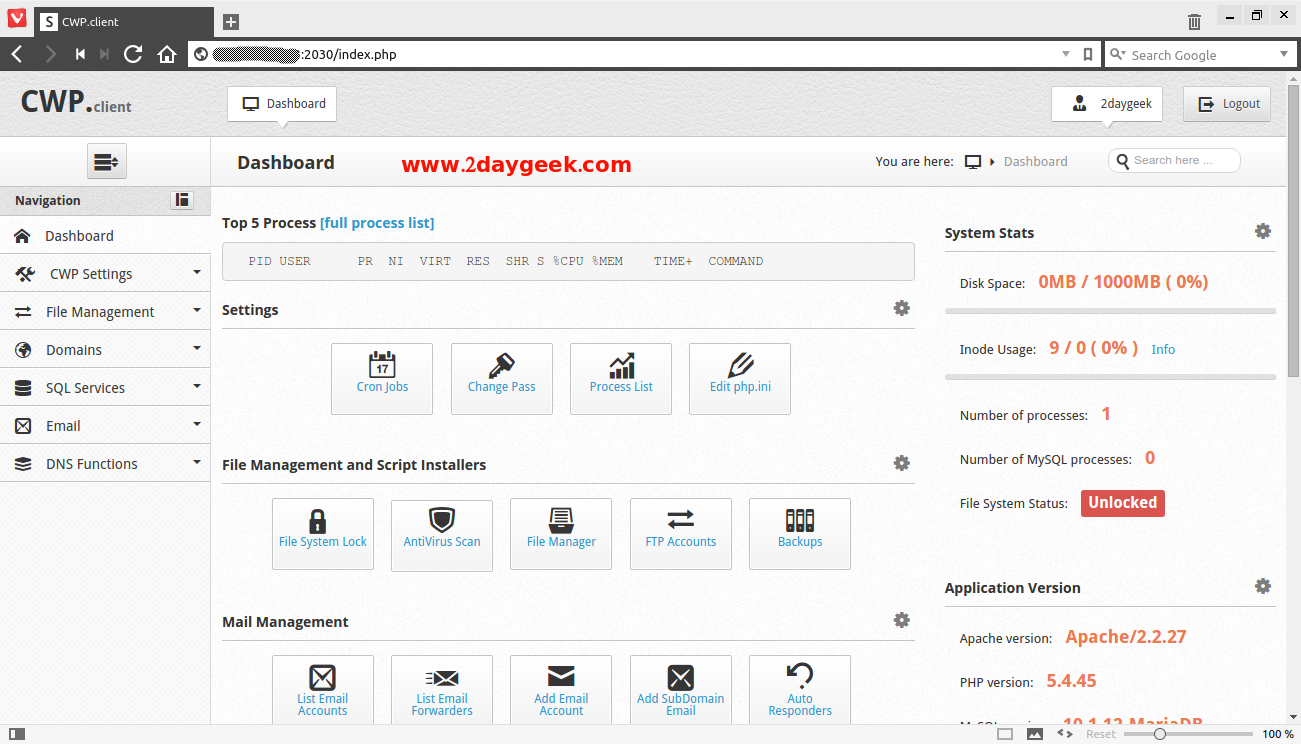
CWP Client: CWP Client also using the same port, See the below screenshot.
5) Upgrade CWP to latest version
CWP has automatic updates which are done via crontab. This will happen after 48 hours from release time, and mean while if you want to upgrade, you can easily upgrade CWP to latest stable version by issuing below command.
# sh /usr/local/cwpsrv/htdocs/resources/scripts/update_cwp
or
# sh /scripts/update_cwp
Enjoy…..)




Hi!
Great Tutorial.Hi kindly assist in figuring out the following.
I Want to host my website within the LAN.
I have already registered my Domain with Godaddy.
The Domain is already pointed to my ISP Nameservers .
I have successfully installed CWP on server in My LAN
I request guidance on the following.
Nameservers–Should i use the oe for my ISP ie ns1.ISP.com 1.1.1.1
ns2.ISP.com 2.2.2.2
Shared IP. should i use The local ip for the server i have installed CWP ie 192.168.0.0
Thank you
I have the same ovh vps, what ip’s should I enter for the ns1, ns2 nameservers?
If u have a single IP enter the same IP in both location